
Disclosure: Content linked in this article may be affiliate links. All that means is that I may earn a few pennies if you use the link and make a purchase – it helps me keep this site up 🙂 This post is not sponsored directly by these companies and only contains products that we genuinely love and recommend for any keyboard enthusiast. So thanks in advance if you choose to click!
Looking back, I realized that actually programming the keebwerk nano. slider was not the easiest thing to do. Looking for an answer online was even more difficult so I figured I would share my experience here and possibly help others that are having trouble programming the keebwerk nanoslider. The keeb was simply too beautiful for me to just leave on the shelf unprogrammed.
I was lucky enough to stumble upon a video on YouTube by Jimmy Nguyen who had similar issues with the device. He actually made his own repository with only the Keebwerk Nano. Slider firmware that helped me create this tutorial. Here is his video (great taste in music too!):
I will list a few issues that I have found along with what I did to make it work.
What are the default settings?
This one drove me a bit crazy. I received the bentō version that came with the cool RAMA collaboration aluminum keycap but I could not, for the life of me, find out what it did. I also wasn’t able to find the default map online anywhere until I actually tried to program the thing.
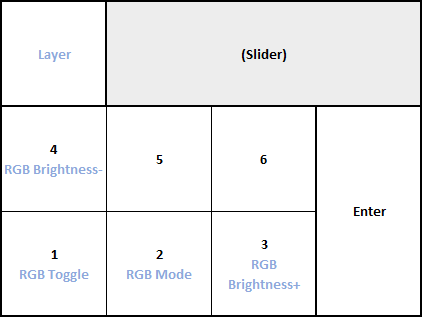
Here is a quick diagram of the default settings if you want to start using it right off the bat (although there may be a chance that the slider doesn’t work):
Up until this point, I had no idea what input the slider was actually sending. I knew it was MIDI and started from there. The next section will explain in further detail.
Check for Slider MIDI Input Type
The slider is the namesake and unique proposition of this product… for me, it was also the most difficult feature to figure out. The issue with my Slider input was that it was not set to the correct input type by default.
I found an application you can install on your desktop that can read midi input. After plugging it in and setting everything up, it turns out that by default. My device came with the slider input set up as a musical note. The correct input type for the slider is “control change.”
If you are having trouble identifying if the MIDI input type is the issue, you can download MIDI-OX here to check the input feed of the slider. Here is a screenshot of the application showing the correct input event type:

If you find that the MIDI input is the problem, you will need to flash the device with some fresh firmware. You can read on for a quick tutorial on how to program the firmware and flash your device with QMK Toolbox. You don’t need to change any of the firmware if you are already satisfied with the default keymap but you will need to flash the device with the default firmware to correct the MIDI input type.
How to flash your Keebwerk Nano Slider
So by now you have identified what issues you had with your device. In this section, there will be a quick tutorial on how to program your device and change the keymap.
You will want to have the following free applications installed:
- QMK Toolbox
- MSYS2 Terminal
- Notepad++
If you have MSYS2 and the QMK repository, QMK Toolbox is not required but convenient to have. QMK Toolbox just has a UI and is beginner friendly.
Customizing the Keymap File
As Jimmy says in his video, the instructions provided are not very clear so he created his own folder for the firmware that you can download here.
You can open the zip file and place it’s contained folder anywhere. I renamed it “nano” and placed it in my “keeb” folder in my B: drive.
Once you have downloaded the fork, you will want to open the unzipped folder and navigate to
Qmk-nanoslider-1.3-master > keyboards > nanoslider > jimmybnguyen
and open the file “keymap.c” with Notepad++. (Notepad++ is completely optional but automatically formats these files for easier readability).
Jimmy added a neat little cheatsheet into the JSON file showing how the keymap is laid out visually and you can more easily determine which keycodes to change. Here’s how it the cheatsheet looks:
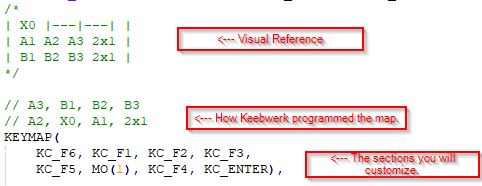
You will be adjusting the text following the keymaps with QMK keycodes to your preference from here. Jimmy’s Visual Reference shows how the layout actually is visually and the second section shows the order those keycodes will have to be placed.
Here is a list of QMK Keycodes you can reference: https://github.com/qmk/qmk_firmware/blob/master/docs/keycodes.md
Compiling the Firmware
Once you have the keymap customized to your liking you can save it and exit Notepad++. From here you will want to access the folder and compile the firmware using MSYS2. You can do so by following these steps:
- Open MSYS2
- To navigate to the folder, use the “cd” command. My folder was located in the keeb folder of my B:// drive so my entry looked like this:

***Note that I renamed my folder “nano”. If you did not rename the folder it will still be
called “qmk-nanoslider-1.3-master”
- Once you are in the correct directory, use the command “make all:all” to generate the firmware. It will be a .hex file and will be automatically sent to the root of the folder.
- Now that you have successfully compiled the firmware, you can open QMK Toolbox to flash your device.
Using QMK to Flash
First open the cover from your device, plug it in, and open QMK Toolbox. You will want to locate the .hex file you created by clicking “Browse”. Once you have it loaded and ready to go, flashing is simple as pressing the tiny reset button on the PCB and clicking flash! By default, QMK will reset your device so you can use it with your new keymap right away. If your device is unresponsive still, all you need to do is reconnect your device.
And there it is.. A long explanation to a seemingly simple solution. Hope this works out! If you have any fixes or issues you discovered outside of the ones mentioned here, please leave a comment so others with similar issues might be able to help!
Discover more from The Keeblog
Subscribe to get the latest posts sent to your email.